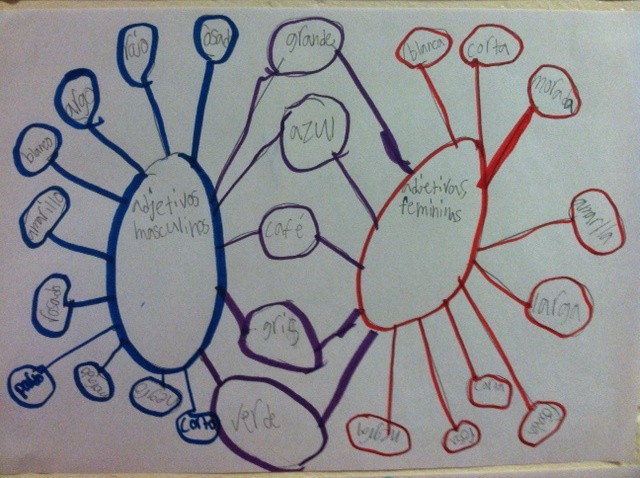
Double-Bubble: Spanish Adjectives
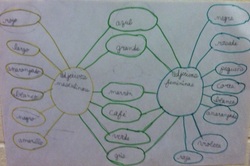
After several lessons concerning Spanish adjectives, students brainstormed lists of adjectives that can be used to describe masculine nouns, those that are used to describe feminine nouns, and those that can be used for both. They used their brainstorming lists to create double-bubble maps.
I made a double-bubble on the SmartBoard to help students prepare. We discussed using only three colors to make our maps look neat and easy to read. I found that my students also needed refreshers on the difference between an adjective and a noun. I liked these maps because it helped students better understand that some words changes (rojo, roja) and some words play both roles (grande).
I made a double-bubble on the SmartBoard to help students prepare. We discussed using only three colors to make our maps look neat and easy to read. I found that my students also needed refreshers on the difference between an adjective and a noun. I liked these maps because it helped students better understand that some words changes (rojo, roja) and some words play both roles (grande).
Double-Bubble: Halloween & "El día de los muertos"
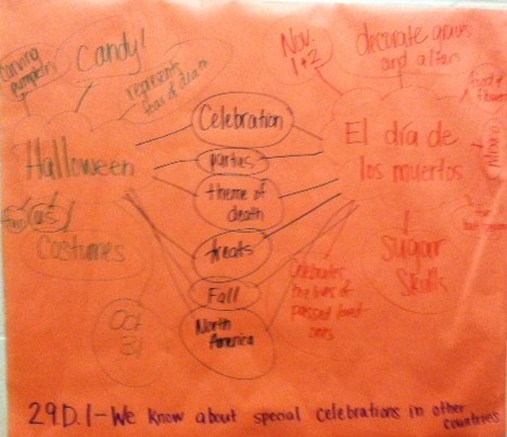
In this lesson, I read the students a short, non-fiction story about "El día de los muertos" and asked them to brainstorm ideas of how this Mexican holiday compares to Halloween, an American holiday that falls around the same time.
Students talked about the difference in location and meaning, as well as the similarities in the two celebrations.
* I have also adapted this activity to compare "El día de los muertos" in Mexico with "Obon" in Japan when the third grade class was studying Japan.
Students talked about the difference in location and meaning, as well as the similarities in the two celebrations.
* I have also adapted this activity to compare "El día de los muertos" in Mexico with "Obon" in Japan when the third grade class was studying Japan.
Bridge Map: El Cuerpo
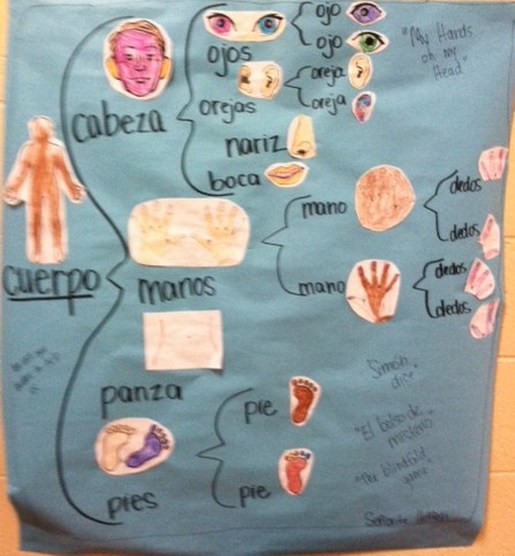
In this lesson, students broke apart the pieces of the body. Since this was completed in Kindergarten, we focused primarily on the parts of the head/face. Note that we also addressed the singular and plural.
Prep: First, I printed and cut (with help from my loving boyfriend) clip-art body parts. Next, I laid the parts onto the paper and wrote the words (& bridges) to complete the map. Now I was ready for class!
Lesson: During this lesson I gave each student a body part and allowed them just a few minutes to color. Then, I invited them to the carpet (colored body part in hand). When I named the body part the appropriate student/s would come up and I would help them glue their picture on the map. We did a quick review at the completion of each bridge. We used our last few minutes to create a frame of reference by brainstorming songs, games, and activities that helped us acquire this knowledge.
At the end of the lesson, the students took pride in their map, knowing that each of them played a part in its creation.
Tree Map: La familia
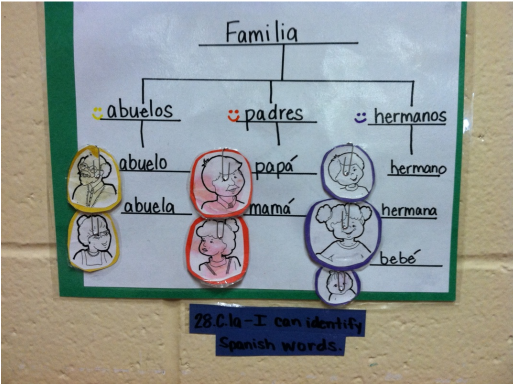
In this lesson, students used a Tree Map to categorize their family members into groups.
Prep: First, I drew a Tree Map, leave room for small pictures next to the words. Next, I cut clip-art pictures to size. I color-coded the pictures by gluing onto colored paper. Then, I laminated all of the pieces. Finally, I cut slits next to each word and slid in a paper clip.
Lesson: This activity was completed as a learning station (other stations included: memory cards, SmartBoard memory,and dice counting game). I placed the pictures in a baggy and students took turns pulling a picture from the bag. With help from their group members, students chose the correct word to match the picture.
After this activity was finished, I hung it in the hall as a reminder of the students' hard work in learning "la familia."
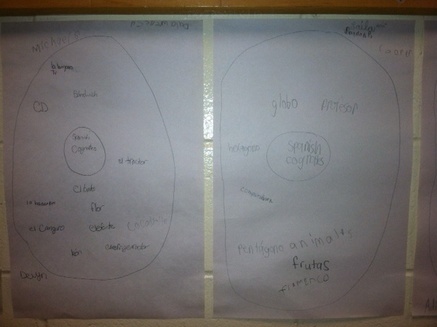
Cognates - Exploratory Circle Maps
In this lesson, students used Spanish reading books to search for cognates. They brainstormed independently and created circle maps in small groups. I saw a cognate word wall on Pinterest and decided to create one myself (I guess didn't pin it, because I can't find the link now); I had the word wall up for a few days before doing the lesson so that my students had a chance to check it out.
Prep: I keep a basket of Spanish reading books on my cart (yes, my cart... did I mention that I do not have my own classroom?), but for this lesson I sifted through and made sure that I had enough books for each student to have their own. I also checked to be sure that each book contained at least a few cognates. In addition to the books, I gathered scratch paper for brainstorming and large paper for our circle maps. On the SmartBoard, I made a quick circle map that included a few cognates that we have learned through our text (violeta, rectángulo, globo, computadora) in order to help the students get started.
Lesson: Do a quick review of the Spanish alphabet and sounds to help students feel more confident while reading/decoding in their reading books. I had students pass out textbooks and scratch paper and I gave each student a reading book (I passed those out so that I could give students books at their level). Discuss the idea of cognates and review some familiar cognates. Then, give students about 5 minutes to brainstorm on their scratch paper. They may choose to make a circle map, or to just make a list. During this time, float around to check for understanding (I saw a few students just writing down every word, so I stopped to reinforce the definition of cognate). Finally, after giving students time to brainstorm individually, pass out the big paper. Assign one student to draw the map and ask students to write one word from their list (checking with group members to be sure it's a good one) and then to pass to the next group member. This way, everyone gets a chance to write. Since I only have 30 minute class periods, my students did not get a lot of words on their maps; however, they did have quite a few words on their brainstorming pages, which they got to keep. I loved this activity because it not only helped reinforce the idea of cognates, but it encouraged students to make inferences during free reading time -- now, when they get free read time with their Spanish books, they are on the look-out for cognates!